Monday, May 9, 2016

Art with Fabric..."The Kiss"


Welcome to my stop on Alida's Art with Fabric blog hop!!!

I was delighted when Alida asked me to participate but also completely clueless as to what art masterpiece to try to re-create in fabric.  Little did I know that the piece I choose is considered to be of higher value to the art world than the Mona Lisa. I must have a good eye for art ... that I was totally unaware I had... "Unlike the Mona Lisa, which disappoints when you confront it and the crowds gathered around the salle in the Louvre that holds it, "The Kiss" by Gustav Klimt surpasses expectations" writes, journalist Adrian Brijbassi.  At nearly 6 foot square and gilded in lots of gold leaf, it is easy to see how it's grand scale and beauty draw admirers to it's exhibit at The Belvedere Museum in Vienna, Austria. It's use of gold leaf depicted in a work of art featuring the earthly pleasures and sensuality were considered blasphemous and profane at the time it was created in 1907-1908, as gold should have been only used in religious depictions according to society at the time. Scandalous indeed.  Gustav Klimt never married and is said to have possibly fathered 14 children, so I am guessing he wasn't too overly concerned with what others thought of him. 


Gustav Klimt "The Kiss" [Public domain], via Wikimedia Commons  

"The Kiss" may be a self-portrait of the artist himself but the woman is thought to be a few different women he knew.  Some believe it is Emilie Floge, a long-time partner and fashion designer Klimt had a long relationship with, others believe it may be Adele Bloch-Bauer, the wife of a sugar industrialist (and Klimt's lover) who he had painted another picture of earlier in the same year, still others think it is 'Red Hilda' a model Klimt had employed for some of his other paintings.  'The Kiss' was bought by the Belvedere Museum for 25,000 crowns (equal to about $240,000 today) before the piece was even done. But how could Klimt refuse to sell it when previously the highest amount paid for a piece of art in Austria was a mere 500 crowns. In 2006, Klimt's less renowned, Adele Bloch Bauer 1 sold for $135 million, which at the time, was "the highest sum ever paid for a painting" noted the New York Times at the time of it's sale.
While Klimt is noted for the saying---All Art is Erotic---I was immediately drawn to the Art Nouveau quality of this piece along with all it's wonderful geometric shapes not it's eroticism.  While not the most erotic piece of art I've seen I will admit all those triangles, rectangles and circles really got this quilter's heart all a flutter!!! They were just begging to be the subject of a quilted piece.  I also made an immediate connection between this piece and Kaffe Fassett fabrics I adore and that was where I started this journey...shopping for just the right stuff.  I also, love grunge fabrics, and for me all those brush stokes in the sky were just perfect for the grunge line of fabrics.

And below is my finished art piece rendition.  I cut it down to a nice rectangular shape as I prefer that shape on my walls.  My piece finished at 33 x 42 inches.


I started by drawing the piece out onto a couple of 18x24 inches of newsprint taped together with the help of a projector. I originally thought I would just fmq those swirls into the piece but instead free motion quilted the swirls into the background and put some matchstick quilting in area above her dress.  I really didn't want quilted swirls distracting from the gorgeous Kaffe fabrics.

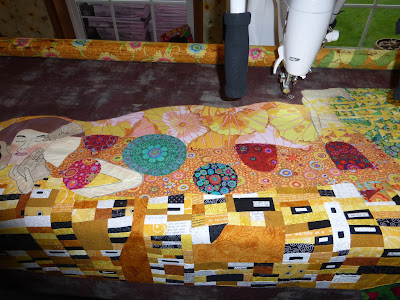
Then I just began tracing each individual section onto another piece of paper and started paper piecing it, working my way across from left to right, with each of those smaller sections then joining together to make a piece of the puzzle come to life.  Below is a picture a little way over half way there.


This lower section of the piece took me one week of evenings after work each night.  Each night I did approximately a fifth of the distance and felt triumphant and overjoyed with the results.  But next up was just as much work with the undertaking of the flying geese sections. 16 sections to be exact.


I think if it were possible to count the pieces of fabric that I used in the making of this I would be in shock.


At this point, I took a week of vacation to try to finish this up.  I have never been a fan of raw edge applique but as this was going to be an art quilt --- that would hang on the wall --- it didn't bother me as much to use some steam-a-seam product since the added stiffness was going to be on the wall not to be cuddled under.  I ironed the pieces together on a white sheet of fabric that I put over my light box so I could get them all put in just the right places.  What I loved about this process was how quickly the piece really started to look fantastic!!!


Before long it looked like this.  I sewed the flower fabric onto the bottom of the flying geese and trimmed it to size. Both the flying geese and the lower yellow, black and white rectangle sections I glued onto the white background with a permanent no sew glue called Speed-Sew.  Where the yellow,black, white rectangles meet the flowers and curve, I was able to turn the fabric under and top stitch so I could eliminate the raw edges on the pieced section that would not have laid flat. I didn't want any seams in the brown background so I used a method that I have used in circles before involving flanges. I ironed on freezer paper on the back of the brown background in the shape I needed and then cut it out a generous half inch larger that I needed it.  Then with the freezer paper still attached I cut flanges into the fabric and spot glued the with an Elmer's glue stick onto the freezer paper. After working my way around the entire piece. the pulled out the freezer paper working it back into shape with my iron and then glued it to my piece around it.  In this manner I was able to create a turned edge applique shape out of my background.  I then just took it to my sewing machine and top stitched it down.

I didn't take a picture of this part of the process but the picture here shows what I am talking about with the flange process. You just need to pull out the freezer paper and flip it over and iron it back into shape and applique it into place.


After getting the background into place, I then free motion stitched around their hands and her feet and then added facial features. I have dabbled with sketch sewing before and although it still makes me nervous, I for one love what it adds to the artwork of the quilted piece.  I just use a very fine black thread by Madeira and go around the area to outline a couple times, sometimes three trips around gives me the look I want. I then used some Intense Ink pencils and some Staedtler Watercolor crayons to add some color to their facial features, even adding a little shading on her feet and arms.


While the flying geese in the green are paper pieced, I found it easier to just raw edge applique the triangles over the feet and in her dress.

I said yes to Alida's request to join this blog hop because 1. It was an honor to be asked and I appreciate her as a blogging friend and 2. I like pushing myself beyond what I think I am capable of from time to time.

Although making deadlines is not my favorite thing to do...the benefit to me so outweighed the inconvenience of time involved.  Not only did I end up with an outstanding piece of art, I gained much needed practice at applique, sketch sewing and it was my first time using my art ink pencils, too!!!  But best of all....I used my new Grace frame and stitch regulator for the first time since buying them last September.  I get bogged down sometimes by my own insecurities of not knowing what I am doing that I just don't try.  This frame and the stitch regulator cost me a pretty penny and it's just been sitting there.  I can't tell you how many times I had to watch You Tube videos just to figure out how to get the quilt on the frame and all the stress involved getting to get the tension set correctly on the Juki.  You can see in the left corner on the take up arm all the thread problems I had at the start, luckily I got them worked out and the system worked well and I think for a first time using this frame and regulator that I am tickled with the outcome.


Thank you so much Alida for giving me the opportunity to push myself past even what I thought my limits were and realizing I can do anything I set my mind to!!!  After conquering my fear of the quilting process it was time for adding the binding and embroidering some flowers in my lady's hair.


I love this white and black binding choice! It really complimented the white and black in the piece and added the perfect frame around it.


I hope you've enjoyed seeing my art rendition of Klimt's Kiss and are inspired to give creating your own masterpiece a try soon.

Please be sure to check out what all the others participants have been creating with this art with fabric assignment. I am sure you will be as blown away by their talent,skills and ingenuity as I have been.   Here is the list of fellow participants, please hop along with us and see what other masterpieces have been created in the process and how they did it.

Monday, May 9th, 2016


Tuesday, May 10th, 2016


Wednesday, May 11th, 2016


Thursday, May 12th, 2016


Friday, May 13th, 2016


Sunday, May 17, 2015

My green RSC block for May 2015

Rainbow Scrap Challenge color for the month of May was green.  I have a lot of greens but didn't want to use my darkest ones as they didn't seem to fir in with the rest of what I've done this year so I opted for all my lighter green scraps.  It produced a block quite similar to the yellow one but I tink it will be a great addition to the quilt I will just have to keep them away from each other in the final layout I think.

Which brings the total to five blocks and they look like this together.


I do like the darker values the best so maybe the darker greens would be amazing in this quilt top after all.  I also love seeing all the secondary patterns that show up when you place them all together!
Maybe I will find the blocks will need to be done in both light and dark values to help the over all quilt move from a dark side to a light side?  I'm thinking by the time I have nine of these done I will have a better idea if I will be needing to make extra of certain colors.
 
Keep Stitchin'

Thursday, April 30, 2015

Round Robin Finish

Well close to finishing at least!!!  Some of the ladies have finished and I have been plugging away on mine and it is time to share our progress.  This fun Round Robin started in November last year when we created our center block and sent it off on it's journey.  Each month a group member added an addition according to our organizer, Bea's plan, as this was a planned Round Robin where we each agreed to follow the rules of the month.  Below is the block that I sent off 6 months ago to the group of Round Robin ladies.  I used the little bear pattern from Tartankiwi  which can be bought from her payhip site at the link.


The first month we were to add three inch blocks all around the center block that was sent to us.  Bea's block was the first one I worked on and part of the rules were we could only share a snippet if we were to blog about it...Can you believe the only pictures I seemed to have taken were of the snippet I shared that month?  I don't have pictures of my completed round but luckily you can see her finished quilt on her blog at Beaquilter.  She started off with a center block of a flag and sent a note saying it would be donated to a veteran.  I loved this chance to honor a veteran so I added 5 stars and the saying 'Liberty For All'  around her block. And sent it off for it's next addition.


The following month, December, found me adding six inch blocks the top and bottom of  Carol's quilt top.  I decided to echo her center star block with a few additional star blocks around it in similar colors.  One of the things I loved was Carol had sent a note explaining she did not want anyone purchasing fabrics for her quilt but to add something from our current stash.  It was fun choosing just the right combo of colors to complement what she had started.  I loved the border Bea had added and it allowed me to add a pop of blue in there. To make all those tiny stars happen in such a small space I just took some patterns that are available for free at the Quilter's Cache and drew them up so I could paper piece them. Those stars inside stars got pretty small and paper piecing allowed me to get the accuracy I needed. The patterns I used were all from a group called Valley of the Sun Stars.
Top row used:  Go Along #1, Carolyn's Star, and Go Along #2
Bottom Row used: Ellen's Star, Go Along #2, Linda's Star


In January, I had the most fun adding six inch blocks to the sides of Mary's quilt featuring her bug house in the middle. She sent a little booklet explaining her Bug Hut theme and included a little picture of a house that she admired and had drawn inspiration from for her center block.  So I sat down with some graph paper and drew up a similar house I could put on the sides to give more lodging for her bug friends.  I couldn't resist putting a bird in one of the hut's windows as I knew he would be tempted to move in with all those tasty treats living so close by.  The block had been sent to me from Julianne and she had included this wonderful low volume bee print for one of us to use if we would like.  Heck yeah!!!  Not only did I use it up but it inspired me to make the four bee blocks in the corners that I used it in. The bee pattern can be found as a free pattern from Beth of Piece By Number here.  Thank you so much Julianne as I'm sure without your fabric contribution I would not have been inspired to include them and they turned out so delightful!


February had me in turn working on Julianne's quilt top.  This month our contribution was not as demanding, with us only adding a row of three inch blocks to the top and bottom of the quilt top.  While a quick little addition is sometimes an easy no brainer I wanted it to have a dramatic impact on the quilt none-the-less.  Not as easy as it would appear and it took me a while to find just the right block to contribute.

Julianne's quilt was very scrappy, which I know she loves, and made it easy to pull from my stash but I just needed the right pattern.  I found this diamond pattern that was part of a pattern called feathered star in the Spring 2001 Foundation Piecer journal and it just seemed perfect as it echoed the shape of Mary's stars and even Julianne's center block in my mind. I know it looks like I added them to the sides instead of the top and bottom but a quick 90 rotation takes care of that.


Lastly, that left Allison's quilt top to work on in March.  Wow, this time we were to add 26 six inch blocks all the way around the quilt top.  When I opened the package containing Allison's quilt, I was simply blown away by how cute it was.  Allison also sent a little booklet explaining the story behind her quilt top.  She is turning 60 this year and having been born between Christmas and New Year's she felt she had kind of always been short changed at her birthday and wanted this quilt to commemorate this milestone in her birthday since this one was going to be a big one.  She even gave us permission to go wild, be crazy and think fireworks, champagne glasses, and even suggested using LX for the roman numerals 60. Loving the opportunity to go big and wild, my brain went into overdrive. Mary once again sent inspiration by including patterns for cake slices, ice cream cones and party hats!!!  Wow...I was on an emotional overload wanting to include them all as they all appealed to my paper piecing loving self to the max!  I found a different pattern for ice cream cones that I really fell for from Annie's Musings. You can find the pattern at the link.  It lent itself well to the six inch block if I made the cone part one of the six inch blocks and the ice cream another six inch block. I put three of them on each side and that left the top and bottom open for more block ideas.  Well champagne glasses didn't seem right with all that ice cream so I decided if this was to commemorate her 60th Birthday I should just put Happy 60th on it.  So I paper pieced it out and had it up on the design wall for a while before deciding it ruined the "Oh how cute" feeling that I first felt when I opened that package and saw her quilt top for the first time.  I loved that "Oh how cute"  I had felt on first glimpse and needed that to be the overwhelming response when looking at this quilt again. It was back to the drawing board to see what direction to take next.  I decided with her center cake and all that ice cream we just needed to slice it up and serve it to everyone!  Since Mary had included the pattern for the cake slices, I set to work on adding them to the top and bottom and even got to work those fireworks into the corner to help her celebrate her birthday with the bang she deserves.  The pattern I used for the fireworks was actually a pattern called Wyoming Whirligig that I located in a book called Paper Piecing Potpourri from Quiltmaker and Quilter's Newsletter.  Allison, I had a blast adding my border around your quilt top and wish you all the best as you celebrate your birthday this year!!!  I hope your 60th birthday is nothing short of spectacular!!!


Now that brings us to April and me receiving my top back.  WOW...I was blown away by the pure awesomeness when I opened my package!


I sent him out with quite a few coordinating prints as I wanted the top to have a cohesive look that is not always found on Round Robin additions. It paid off and I LOVE, LOVE how my top looked when it came back home to me.  Mary added some bear paws right off the bat, which I certainly secretly hoped would be included in the quilt.  Bea then added some wonderful embroidery blocks and they were just gorgeous!!!  She added an outstanding bear and another block that said, 'Beary Special'.  Well, I couldn't say it better this quilt top is certainly a 'Beary Special' one and she included some more bear paws and sent some more coordinating fabric off with him.  Thanks so much!  Allison then added some chasing geese blocks on her round and hoped they could pass the muster.  Wow...she is a silly goose because they were a WONDERFUL addition to the quilt and I love them.  They are perfect and amazing surrounding him.  Carol added just the perfect mix and blend in her scrappy addition and Julianne's border of pinwheel blocks are the perfect frame around him and I love all the additional fabrics she used while still having my original fabrics to use and give the quilt it's overall unity. Uh-Mazing job ladies!!!  Thank you to each of you for all the love you contributed to Little Bear.

Now it was time for my final border around it and I thought I would just add orange bear paw units in two opposite corners on each side having about 6 or 7 of them meeting in the two corners...but I just didn't like how it looked.  I thought it would be a good frame but it was just too shocking.  So I just kept adding bear paws and making them all the different colors reflected in the quilt. I kept all the paw pieces one color hoping they would stand out and frame him.  They do indeed perfectly.  I arranged them all which ways but loose but finally decided on having the right half face in and the left half facing in, in the opposite direction.  It takes 64 of these and am only a little way over half way now.  I have two sides sewn on and look forward to it's completion but I find making any block repeatedly tedious...so it will take me a little while longer.  Then I think I will add another row to the top and bottom so I will have a nice lap quilt to cuddle under this winter in front of the fire.  Would it be awful of me to add a couple arrows to the top and bottom.  I certainly mean no harm to him but having done daycare for 12 years while my kids were growing up, I loved the story Going on a Bear Hunt...I'm not scared.  We loved echoing the words and running back in reverse of the story to get back home just to say again...I'm not scared!  Good memories and this quilt will be my good memories quilt of all those enjoyable years raising my children and so many others!

What more can I say?  I just adore him to pieces!


Thanks again to the wonderful group of ladies who devoted their time, energy and love into creating this outstanding quilt with me!!!  Thanks Bea, Mary, Allison, Carol and Julianne---you girls rocked this---Thank you so Beary Much!!!  Bear Hugs and loads of Grizzly Gratitude :)

Tuesday, April 14, 2015

Pluging away on many things

I have been busy working on multiple projects at once.  I just get too bored working on any one thing, so lately, I just juggle projects as the mood strikes.  I currently am juggling these projects:

My gnome project for a swap on Instagram with a June shipping date.  I decided on making a mini wall hanging.  I put together the gnome and mushrooms by Cyrille of Bubblestitch and created a Gnome house for my Gnome and am bordering it with bellflowers from the Secret Garden pattern from the Spring 2004 All-Time Favorites Quiltmaker magazine.  I am considering putting a bellflower on the other side of the project as well,  it is quite a bit of additional work but I am sure it would be worth it.  I love the idea of the gnome living in it's own Secret Garden and it seems fitting to have it nestled between the bellflowers.  It currently is 13 1/4 inches by 16 1/2 inches so adding another bellflower should finish it up as an almost perfect little square.  I took all the original patterns and made them 50% of their original size.

I love all the low volume and the little fox and deer living with the gnomes just are so sweet.  I love that whole wee wander line.  I hope my partner will love it, too!  And the little frogs from the Heather Ross print...too cute and a few chickies scattered in for good measure...what's not to love...right???


Today, I finished my pillow that I must have put off to the side a couple of months ago,  I want to be able to use this pillow on my deck this Summer and since this is suppose to be a really nice weekend it was time to do it.  I've been procrastinating because I had decided to put a zipper in the back this time but it really wasn't hard at all... but I need to do it a few more times and perfect the size of fabric to cut.  This time I just over sized and winged it from there and I need something more precise in the future.  Bottom line is it has a functional zipper in the back so... yeah good job me.


I just threw an old pillow inside that was in need of a face lift.  Sure looks better now. 


Finally, I made the April Rainbow Scrap Challenge block for 2015.  This month brought the color purple into play.  I am using the Circle of Friends pattern found in the May 2014 American Quilter issue.  The pattern is by Katie Wells and I love how these are turning out.

I love how the group of them are looking together so far.  I really wasn't sure what to expect using a different color each month and putting these together, but am excited to see this one grow each month.

My only regret so far is wishing I had used a lighter yellow in the outer corners of the yellow one. It is definitely a mistake I will keep in mind when choosing colors in the future.

I am still working on my round robin quilt top.  I got it back in March and will be sharing it at the end of April here when Bea from Beaquilter does a linky party with each of us who participated and I am dying to see everyone's quilt top and what has been added to them since I last worked on them. In the meantime, I am supposed to be adding 64 blocks to mine and I hate making 64 blocks of anything...Yikes!!!  I had better get busy...so far I only have 12 of those done.  Glad I have a little more time but so many things get me sidetracked.

And of course, I now have those piano key blocks to add to my Technicolor Galaxy quilt top.

Keep Sttichin'

Sunday, March 29, 2015

Technicolor Galaxy Start


My new IG obsession has kept me away too long but I finally remembered I need to update my blog with my latest activities.  I am finally getting around to starting my Technicolor Galaxy quilt using the pattern from Pile 'O Fabrics Alyssa Lichner.  It got off to a slow start in mid January and then everybody participating in her 2015 skillbuilder lessons spent some time working out our color schemes and color options while waiting for our templates to ship from her. 

I first tried out all my center blocks fabric choices for block #1 on a miniature sheet of paper and tweaked a couple of choices and then finally got them cut out and glued onto make center this last week.  I still have to do the bias strips for the stained glass effect the center will get but haven't located the clover bias maker that is required yet.  I am in no rush as it looks to be a lot of work but following everybody on IG sure has made me drool over what others have accomplished and look forward to catching up.

Next up for block #2, I picked out 144 different fabrics that make up the color wheel portion of my quilt top.  If you checkout the hashtag #technicolorgalaxy on IG you will see some outstanding beauties that are being created with this pattern. 


Last week, I completed the 12 sections that comprise the next round.  I LOVE how this is looking and have to trust that with Alyssa's lessons will be able to figure out how to put this thing together at the end of the year.  In the meantime, I need to commit to quilting each of these pieces but I have so many things to balance and juggle it seems impossible to finish anything as I love starting new projects.
 

Within two days time, I had the blocks done and put away to make time for the next project.  I made a practice block for the beehive I'm in this year but I will need to redo it as it is not up to my standards.  Next to procrastinating a finish, my hatred of redo-ing a block comes in a close second.
But since it is not due to ship until late April...I will just add it to my ever growing list of things I am procrastinating to do.

In the meantime, I am spending some time drafting my mini quilt for the gnome swap that I need to complete by June and since I know my propensity to not finish things, I need to at least get my favorite part done so I can move on to the finishing phase of it on time.  Plus, Spring has arrived in the Pacific Northwest and along with continuing to clean my new sewing room space, I am sprucing up the flower beds --- don't you just love Spring!!!
 
Keepin' Busy and Happy,

Tuesday, March 3, 2015

Scrappy Trip

After sitting out a couple of rounds of Julie Hirt's Scrappy Trip Around the World Quilt Bee I decided it was time to participate again.  Of course, Julie's announcement that she would be ending it after a few more rounds this year certainly lit a fire under me to get back to this quilt. I currently have 18 of these blocks from past rounds and am not sure how many or big I am making this quilt but a couple more rounds sound perfect.

The hive I am in this time are speed demons and quickly set to work on their blocks so I decided to join in and get them off the to do list.

Here they are:
For Lee...Loved her color choices
The pink and orange really shine in my Kaffe Fassett fabrics
 

For Jennifer...these are her color choices
 
For Jane...she wanted modern and bright
I must admit I struggled with this one. Most of my moderns are text and not bright.
 
For Sandy...Black and White with a pink center stripe
Love the typewriters and all the text prints
 
For Laurie...Black and White with a red stripe in the center
 
I had a great time picking out the fabrics and putting them together.  Everyone's color choices were so much fun to work with.  I can't wait to get all my blocks. Three of them are made already and look fantastic!!!  Can't wait to put them with my current group and arranging them.

I have been busy over here moving my sewing room from upstairs where I had a 13 by 26 foot area to downstairs where I have a 10 by 10 foot room.  I am also using our sunroom for over flow and set my handiquilt frame up out there that hasn't been in use for over...I don't really know the last time I used it...maybe 6 to 8 years ago.  I never really liked it since I just use my domestic on it but with all the modern quilting embracing straight line and squiggles I thought it was time to give it a shot again.

Keep Stitchin'

Sunday, February 15, 2015

Progress Update for February

February hasn't been my most productive month for me. It started with us out of town and then last weekend we spent the weekend moving my sewing room from upstairs to a downstairs room.  I have had a knee bothering me for the last year and my husband thinks being downstairs will help it so I am moving the sewing room from a 13' x 26' room to a 10' x 10' room.  YIKES!!!
 
Good news is I am back to being able to sew and this weekend got quite a lot of things caught up.
 
I have my round robin addition on and ready to send on it's way to it's March destination. The pictures I took turned out terrible so I will try to get a couple snaps before I send it on it's way so I can show a tidbit.
 
I spent the week carousing my fabrics looking for the right combo for my beehive block this month.  It is the first block for the swarm and this month Melanie is our Queen and picked out the Chainlink block from  Alyce at Blossom Heart Quilts.  I was a little unsure of all the pieces but it went together so smoothly and Alyce's directions were super!!!  It has been so fun to see all of our blocks as they are added to our IG feed.

Second up was the second block for my RSC blocks.  This month the color selected was pink and it only seemed fitting for Valentine's Day to use all the heart fabrics.  I love how these are going to look in all the colors and I really love how it looks next to last month's block.


Then I worked on two more blocks for the Sew Simplicity block of the month by Jacquelynne Steves.
This one I adore by itself but seems so muted next to the others.  I still have to do the applique to the center of these last two but am excited to get them this far.  These have SO many pieces!!!  I think if this one is going to work I am really going to have to use the dark values in the applique pieces because right now it seems so washed out.

No wonder, look at it compared to the others it seems so light, too light.  It totally reminds me of the awesome Spring weather we had this weekend but is so unlike the other blocks.  If there was going to be 9 or more of these blocks I could make it work in the center but this BOM only has 6 block and I do not want to do all of these twice.  Jacquelynne suggested a setting of 4 or 6 blocks so maybe I should just settle on 4.
 
I have been having fun over on IG.  More checking out what everyone else is up to but in doing so found a couple of IG only swaps that I simply could not pass up.  First one is a gnome swap and the second is a Fairy tale swap.  Both have June/July finishes so I am anxious to get partnered up and start planning on what to create for both of these swaps.
 
Still Stitchin'


Related Posts Plugin for WordPress, Blogger...