Showing posts with label 2013 BOMs. Show all posts

Sunday, January 19, 2014

Quilt Doodle Doodle Blog Hop Day 3

2013 was a great year of growth for me thanks to some wonderful BOM programs I participated in.  While I have been quilting for many years, I get stuck in a rut and like to stick to my preferred method of paper piecing.  Do you ever get stuck in a rut?  Find yourself doing the same thing because it's comfortable???  Traditional quilting is wonderful but can kind of drive me crazy with it's requirement for exact 1/4 inch seams...without which it is almost impossible to get the correct finished size blocks to piece the quilt together as the plan goes.  Cindy from Quilt Doodle Doodles hosted one of my favorites projects from last year.  Each month she posted a free pattern that centered around a very classic 12 1/2 inch unfinished block.  I loved it because unlike some of the other programs I participated in each month the pattern consisted of 2 pages of wonderful and concise instructions.  The blocks were clearly designed and fun to chose colors for.  She has a Flickr account and I thoroughly enjoyed sharing each month and checking in on what other group members had produced and watching their progress, too.

I was sincerely hoping and still do hope to get this top finished this month to get the year off to a great start.  Preferably I would have liked to have it done by now but the year started out with throwing me on the couch sick last weekend and slowly recovering this week.  But I will prevail...I have the top assembled and love how this is coming together so far....


I know I'm a trend follower but love the aqua and red combo and decided to use it as the color scheme for this one and am thrilled with how it all looks together.  My husband thought it looked ideal for Christmas but know it will be enjoyed year round.  Today I was able to get the top pin basted which is half the work of FMQ  so it should be a snap to complete in January for the 2014 Lovely Year of Finishes I have linked it up to as my January goal.

 and here is what the back looks like today
 I must say thanks to Cindy for organizing this BOM last year.  I appreciate all her work involved in getting sponsors and keeping us all on task and encouraging us!  I must also say I loved how she was always so prompt on posting the next month's pattern and that is part of the reason it was such an easy choice to want to participate again this year in her new BOM.  Plus have you seen it!!!  If not you must hurry on over to her blog and think about joining in the 2014 BOM she has in store for us this year.  It is a bit of a mystery...not my favorite part as I love to plan my colors ahead but she has clearly shown us her choices and I'm sure you will agree from the first month's row of blocks that this one will be a winner, winner for all who join in.


What a fun row of happy snowmen!!!  Can't wait to see what February brings and that is what is so much fun about participating in these BOM programs,  plus the chance at some great monthly prizes and who can deny the big win at the end of the year when you have created a project along with a group of great people and made some friends along the way.  Win, win all the way around for me!  Thanks so much for the great project last year Cindy and the opportunity to participate in this year's Mystery BOM :)

Be sure to check out all the other Participants who are linking up on this blog hop:
                                                                        January 18th

January 19th

January 20th
Keep Stitchin'

Saturday, December 28, 2013

Three very different Castles


I have finally assembled the three castles that I have been working on all year long and hope they don't join my ever growing UFO pile.  When I joined so many BOM's this last year I really didn't think the part out about them all becoming UFO's at the same time.  It only makes matters worse that all the new BOM's for the New Year are starting to reel me in hook, line, and sinker...YIKES!!!
Right about now I am seriously feeling the need to join the 2014 Lovely Year of Finishes and actually would be a fool not to.  I wish I wasn't such a chicken sh...It's not like the po po will arrest me if I don't complete my to do list.  I seriously need to read up on the consequences and consider the risks of failure vs the benefit factor. They don't even know where I live so my knee caps should be safe right???

In the meantime...I have made progress on my current year's BOM goals.  Here are the Three castles I have been doing from Ula Lenz's website this year.  She has yet to announce what 2014 will bring and I suppose that is good but I am so curious!!!


I love all three and they will make great wall hangings in 2014

I am currently working on the last of my 20 blocks in the Pile 'O Fabric Skillbuilder 2013 BOM.  Block 19 kicked my bootie and I am hoping number 20 will take it easy on me... It took me three attempts to get number 19 right.  I am surprised I stuck it out although I did give it a long rest between each try which is why I am still struggling to get this one done.  Block 19 was a paper pieced triangle and it had a very nasty Y seam in it.  The first block I picked apart so many times it got a hole in the center :(  In the second attempt the triangles never matched up and I refused to pick it apart.  For the third attempt, I decided to follow the directions ( I know, I know) but she had us use glue on the seams and I HATE unpicking the seams and paper off the glue. Nasty business...but in this case SEW necessary.  I forget what Alyssa called this block but I nick named mine Stargate because the fabrics I used look like space junk floating around the center triangle (Stargate).  Wish me luck on the last one...at least send happy thoughts my way...Thanks!!!

Keep Stitchin'

Friday, December 20, 2013

A few ticks off the to-do list


I am busy prepping for Christmas and making progress slowly.  Hoping to get to baking all kinds of yummy delicious things once I can pull myself away from my sewing machine.  But I am getting some progress made in the sewing studio.

I made my first zipper pouches this week.  The first one I will have to show you after Christmas as I don't want the recipient to get a sneak peek of it but the second one I will show off now.  I must say I had to watch a you tube video to see how to use my zipper foot.  I have never used it before and couldn't figure out how the needle could possibly get to be on both sides of the foot.  I had no idea it had a sliding bar on the back that lets you slide the foot to the other side of the needle.  My zipper pouch is a little bigger than some but I wanted it large enough to stow some smash book supplies.  It even has a medium size smash book in it and some washi tape amongst other stickers and note cards.  The recipient is a teen on my Xmas list and I hope she loves it as much as I do.


I made another tote bag for an elderly lady at an assisted living facility nearby and filled it with yarn and crochet supplies, socks and candies.  I bought this panel this summer on sale and it was perfect for this tote.

and I remembered that pockets on the inside would come in handy...something I learned by forgetting to add them to mine.


I also am trying to finish up some block of the month projects.  I finished up my December block for the Quilt Doodle Doodle BOM. 
 
 
 After buying some more fabric to sash it together, I completed the top yesterday.  I didn't realize how big this would be finishing out at. 12 blocks laying loose all year didn't look like much but after sashing it is now 54 by 72 inches.  I am contemplating adding a wide white border to it but am not sure.  I think I  prefer the lap quilt size rather than a twin size quilt.
For now it is time to put on some Christmas carols and get to some of that baking I was talking about.  I hope your Christmas preparations are coming together, too.  Christmas is quickly approaching and the festivities will soon be here.
Keep Stitchin'


Monday, November 18, 2013

Crafsty 2013 Quilt Top


This has been a lot of fun to put together this year.  It contained a lot of firsts for me, also.  It had the first tumbling block  I've made and certainly the first Lemoyne Star.   Best thing was I really love how the Lemoyne Star turned out!  Not sure I had ever done partial seams before either.  Applique is still not my favorite but I survived and grow more confident each time I do it :)

But one of the favorite things about this top is the HST border.  I have always hated HST's.  Yuck and worst is what I have to say to all those disgusting bias cuts.  Never have found a great way to mass produce them...before now.  Laura Nownes had a great little video each month but in her written instructions this last month said to use your favorite HST method.  Great...I didn't have a favorite.  Before this top, I would choose to use a Thangle paper and paper piece them just to try to avoid the bias problem but hated pulling all the paper off the triangles.  I do it all the time for complicated paper piece patterns and think nothing of it.  After all it is necessary to create the beautiful blocks that paper piecing can give you.  But with triangles it just seemed such a waste of time.  When I went into my file to find a Thangle the size I would need I found a piece of paper I had saved for years probably with never having tried it before.

Have you ever seen this method???  It is amazing???

 You take the size you want your HST to be...in this case I needed it to be 3 1/2 inches
 divide that number by 0.64
so my math problem would be 3.5/0.64 = 5.46875
so I rounded this up to 5 1/2 inches and added a 1/8" to be safe...better to round up and then you can trim your block down to the correct size if need be. You can always add a 1/8 to a 1/4 inch just to be safe like I did and then trim it down after the block is done.
Better safe then sorry :)

You cut two squares of 5 1/2 inch blocks and put right sides together like so:
( In my example I am doing two pairs at once so 4 blocks):
then
placed right sides together like so

Then you sew a 1/4 inch seam around the entire perimeter
 I should have used a different thread color so it would be easier to see

 then you are going to cut it on the two diagonals like so:
and then the opposite direction


when you are done ... you will press open to get these units


you will then trim them to the desired size
making sure to use the 45 degree line on your ruler and the dimensions you need
and before you know it they are ready to use and perfect!!!
Love when that happens!!!

After sewing for years on both sides of the diagonal and thus on the bias,
I don't know why this had never occurred to me, to sew around the perimeter and then still cut on the diagonal.  Makes it easy peasy :)
Here is the math as I found it on the website I found this on. You can see the original post on Whipup
and a video from the Missouri Star Quilt Company
These are starting block sizes and the resulting HST size

12 1/2"------------>  8"
8 1/2"------------->  5 1/2"
6 1/2" ------------>  4"
7" ---------------> 4 1/2"
7 1/2" ---------------> 5"
5 1/2" -------------> 3 1/4"
4 1/2"-------------> 2 3/4"
4 1/4" --------------> 2 1/2"
4" --------------> 2 1/4"

If you try this method I think you will agree it is brilliant!!!
Keep Stitchin'

Sunday, November 10, 2013

Skillbuilder Progress


Pile O' Fabric's Skillbuilder 2013 BOM is down to two more blocks and believe it or not so am I.  Alyssa gave us a little extra time to catch up and it worked out great for me!  For a while I was five blocks down but had been making progress in October.  Unfortunately the last couple of blocks featured applique and I FEAR applique almost as much as the plague. For a great while, I just avoided even attempting them.  But because I am committed to learning new techniques and Alyssa has certainly rocked at teaching more than a few new things this year and boosting my skills, I gave it a go.  I unknowingly did the harder of the two first.  The Liberty Floral block has some major curves at the ends and Alyssa had us glue the fabric to a foundation and use a wooden stiletto to smooth the fabric down around the corners.  She also had us prewash the cut out pieces fabric but not the background because she says when we wash it for the first time the background will shrink and cause the applique to turn under slightly giving it the appearance of turned edge applique.  Since I love the look of turned edge but would never attempt to do it, it sounds like a great alternative for me.  I must say the wooden stilletto ( I think mine is plastic) works wonders.  I bought it at a quilt show a few months back not even sure why I might need it but thinking it could come in handy.  It was amazing and I think this technique would have suffered without it's help.  Each foundation piece was then glued to the block and then zig zagged into place with a very small stitch using sulky monofilament thread. Boy, have I become a huge fan of glue this year.  For the next two blocks, she even suggests using glue to get our paper pieced blocks to come back together perfectly aligned ... better then if we pinned the pieces in place.  She may be on to something here and I will certainly be giving it a try.  I consider myself a pretty savvy paper piecer so if she can teach this ol' dog another neat trick I will be wagging my tail in gratitude.

My Liberty Floral Block

and 

My Modern Beauty Block

This one was much easier as the curves were much gentler.  In fact, the edges could be glued down with no assistance needed from the stiletto.  The end points however, did need the stiletto to turn over the ends and tack down with a bit of liquid stitch.

Here are a few of the other blocks that I think I have neglected to post on the blog before now.


My Geo Swirl Block

My Pixelate Block

My Phoenix Block
and

My Shattered Chevrons

Overall, I am sure that all of these BOMs have kept me from accomplishing some other goals I have set for myself that I should be focusing on.  I wish I had more time for designing my own patterns.  I bought EQ 7 a couple of months ago and need to focus on learning to use it.  It seems to have a steep learning curve but I will find time soon ( I hope ) to set about learning to get the most from the program.  I also wish I had more time for swaps.  I am starting to make time again for them and will have to focus more of my time in that direction in the new year.  I love making new friends with the same love of quilting and swaps enable you to do just that. Then there is the matter of making Becky's quilt.  I have yet to really find my mojo and get a firm grip on what I want it to turn out like.  I have a vision and just have to keep striving to create it. I just know that what I have done so far is not what I had envisioned for this project.  However, I recently saw Tim Holtz's fabric line Ecletic Elements and it was love at first site.  I am sure it is what I am needing for Becky's quilt, so when I won a $25.00 gift certficate from the Fat Quarter Shop for my entry into the linky party held by Kristy at Quiet Play for her And Sew On BOM I knew just what I needed to buy with it.  A huge thanks to both Kristi for hosting the event and giving us such fab patterns to work with each month and another HUGE thanks to the Fat Quarter Shop for sponsoring such a great prize!!!  I am over the top anxious to get my hands on all the fabric I have coming my way. Once ai got to shopping it was hard to stop.  Fat Quarter SHop had such fabulous choices and I am thrilled with what I have coming my way soon.  I was super stoked to see they had the Ecletic Elements line and can't wait to start creating with them.  You can follow the link to see why these fabrics are the bees knees ( at least I think so ).  I think by creating a paper pieced block and combining some applique techniques learned from Alyssa's Skillbuilder BOM,  I will be able to acheive what I am needing to do to be happy with Becky's quilt.  Now to just find the time with the holidays quickly approaching... I will post progress when I can just get that far with the process.  Wish me luck!!!


Thursday, October 31, 2013

Haunted Castle

Well... I had intended to share this much earlier in October...and now it is Halloween so I had better get it together!!!  In my defense I have been having camera tech-NO-calities.  Santa may be needing to get me a new one so I had better be on my best behavior for the rest of the year :)

I have been sharing two castles each month but working on three and it is time to reveal the third castle...where the wild and spooky things have been taking up residence each month.
 Two more months to finish it off but it seemed appropriate to share today.  Lots of spooky critters living inside it and a witch flying past.  Not sure what to call the ogre thing up in the sky, but he looks up to no good!  The whole castle is sitting on a hill of pumpkins, just too cute.  I wanted haunted but fun!  I think where the trees don't look right in the upper left hand side , I will have to do lots of thread play to feather the trees into the upper block when it comes time to quilt it so it looks more normal.

Here is how the Gnome castle is looking:
And here is the Princess castle:
I have to admit to taking a little liberty with the pattern this month.  For some reason Ula made this part of the castle look very Bavarian in style and for me it just didn't fit with the rest of the pattern...so I eliminated the Bavarian wood beams from the pattern and must admit it sure made the pattern go a lot quicker this month so it was win-win for me as I am very happy with the result.

Hoping your evening was filled with delightful little ghosties and goblins and treats and maybe a little cute trick or two.


Tuesday, October 22, 2013

And Sew On Finishes

I took off a couple days from work to get things caught up.  I made sure my family didn't know so I could have uninterrupted time spent sewing.   I had three priorities on my to do list.

1.     2 Mug Rugs for my swap partner, Nanette

2.     Complete my And Sew On projects

3.     Cut all my 5"inch charms so I can get them shipped out

I didn't get to all my other things on my list but I did get these three things checked off and completed.

 Yeah  Me!!!

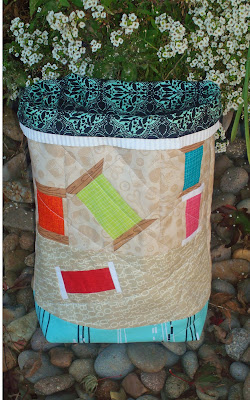
Most importantly was a couple of  items I was making out of my And Sew On blocks from the BOM that Kristy from Quiet Play has been doing the last 9 months.  She is having a linky party at the end of the month to share our completed projects and although I am a born procrastinator, I don't like to push my luck too far.   But more importantly, once again they were going into projects for ME and I wanted them done so I could start using them.  After all, this year is ALL ABOUT ME!!!  I have spent sew many years giving away the fruits of my labor and I am trying to make me a few things for me this year.  I originally had planned on making a mini wall hanging out of them to hang in my sewing studio.  I couldn't think of anything more appropriate for them to end up in but plans change.  I used eight of the nine blocks in a giant tote bag!  Not just any tote bag but one that will accompany me on many, many road trips!!!  I always pack a huge amount of stuff for a road trip because I am a very nervous passenger.  I like to have a ton of reading materials ( Quilt magazines being my favorite) and of course, I like to take my EPP hexagons because lets face it---I will need many, many road trips to get very far on this project. So far I have 11 hexagon flowers completed.  My lifetime project will have to be a small one.  Wink ;) Wink ;)


Front and back of my bag!

It measures a whooping 
17x18 inches
I cannibalized the tote handles from another bag I had for years. I am uber excited with the amount of stuff I can take along with me now and love that the bag will definitely be carrying all my sewing related stuff on my trips!


Do I hear you asking what about the one lonely block that didn't make the cut in the tote bag???
Well, it too had a happy ending.  It never really fit the color scheme of these blocks but as it was the block with the thread spools all over it I knew just what it was meant to end up as.  I made it into a thread catcher bag.  

I have needed one of these for a long time and found the pattern from All People Quilt HERE.  The original pattern was for a smaller version so I just adjusted the dimensions to use my 10 1/2 inch block.  Lets face it I will need the larger thread catcher because when I am paper piecing I will throw all the scrap from trimming the blocks in the sewing machine area into it and then will empty as needed.


I can't show you the  mug rugs I created for Nanette because I don't want my partner to see them before they arrive to her Down Under.  I will say I am thrilled with how they turned out and look forward to sharing them with you in the future.  For now I will just say they are themed around things I learned early on about my partner.  She has worked for years in the Fire Brigade fighting fires, although now she stays at the station and she loves fall colors and of course quilting.  I wrapped those three things into her mug rugs and hopefully she will love the resulting mug rugs.

A few weeks ago,  I joined the Kate Spain Charm Swap hosted by Michele over at Quilts from my Crayon Box and will need to mail them soon.  A couple of my fabrics took the scenic route to me ... shipping from Indiana then going to Honolulu before coming back to me in Washington.  I don't know why they thought I would be in Hawaii...I wish it were true but alas I had to wait for them to boomerang back to the states.
Michele was having trouble filling spots so I jumped at the chance to participate twice and had to wait for my second round of fabric to get it's tail on back here.  I must say I am looking forward to getting so many Kate Spain fabrics in return.  I can honestly say it will be the most fabric of any one designer I have ever owned.  I have a large stash but have never bought fabric by collections or designer.  As a paper piecer by preference, I am usually choosing fabrics by color or textures more than aesthetic value.  I must say, I do love Kate's fabrics though.  I think they lend themselves to paper piecing well.  Here are my contributions to the swap...ready to ship.


Now to add more things to my priority list and hoping to make more progress...


Sunday, October 6, 2013

All caught up

I actually think my persistence has paid off and I am caught up on my 2013 BOMs!  Of, course that does not include my current October blocks but having been three months behind on my castle blocks and catching up feels incredible.  I still need to make my last two Skillbuilder blocks but they actually come out with the new patterns around the middle of the month so for now I am claiming current status.  The Skillbuilder blocks are appliqued blocks so before long I will be behind but I actually finished the others for the skillbuilder so I am saying heck yeah...go me...for the moment anyway!!!

'Candyland'

and
'Saturn'
While the curve piecing was challenging in Candyland, I pulled it off.  I will admit it was not my favorite and it will be a long time before I use this method in my projects again.  However, I really enjoyed the process used in the Saturn block.  I think the resulting circle is amazing and I can see that a whole lot of these in a quilt, maybe with something different in the middle would be awesome.  I didn't own a circle cutter until today.  I bought the Olfa Circle cutter and it works fantastic.  Alyssa from Pile 'O Fabric explained the process used to inset the fabric into the circle beautifully in Lesson #7. You could put whatever fabric (or block) into that circle and I will have to try to create something unique with this method soon.


 The craftsy August/ September block entailed applique. YUCK...I hate this method.  Yet I can see it's value and even admit to loving looking at applique blocks...I just haven't found a great method for me, one that I can enjoy and feel I can master, so I usually prefer to avoid it.  A couple of these BOMs are teaching new skills so I am committing to giving it my best shot. 

October will be a busy month still.  My castles are caught up but the October block is a hard block and I will have to do it three times.  So I had better start those soon.  The And Sew On BOM is drawing to a close but I need to get the blocks sashed and bound.  The Craftsy block of the month top is supposed to be put together by the end of the month, also.  I joined a couple swaps, I need to complete two mug rugs this month to ship off to my partner, Nanette in Australia and when my Kate Spain fabric arrives, cut it up and ship it off to Michele over at Quilts from my Crayon Box. I think she might still have openings in her swap if you are interested in swapping 5" charms with a group of quilters find out more by visiting her blog.


Sunday, September 29, 2013

My Sewing Room


Well that might not be the right title for this post because my sewing room has never been clean enough to post a picture of ... and still isn't...but here is the block I made for the And Sew On final BOM block this month.  It has been great participating in this one and can't wait to have theses hanging in my sewing room in a completed project.


If you have missed this wonderful block of the month you can see all the blocks we have been making each month over at Quiet Play ...Kristy has us link them up for a chance at some fabulous prizes from her sponsors.  Next month we are suppose to put them all together in a finished project.  Kristy has hers all done to inspire us on.  I always need inspiration and drive to complete the project.  Lots of WIPs over here.  Next year I think I will have to commit to finishing some of these lovely BOMs that I am doing this year and are starting to pile up everywhere!  I will need to come up with an action plan for these quickly. Until then...
Keep Stitchin'

Related Posts Plugin for WordPress, Blogger...