Tuesday, September 25, 2012

Sweet Day

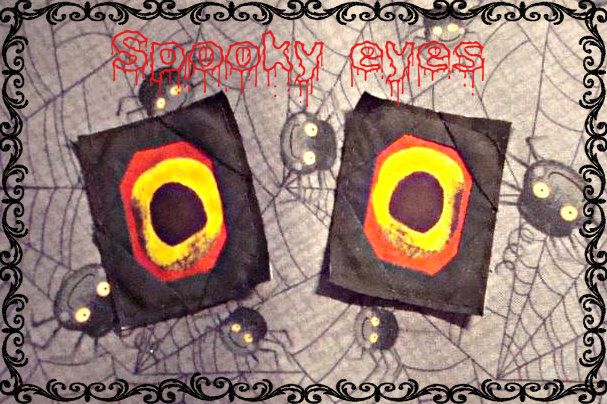
 Yesterday I took a vacation day to accomplish a few things on my to do list at home.  One of which was to get started on my "Wicked" project.  Here is how I started my day. Just a sneak peek is all you get.  I like how my spooky eyes turned out...but whose are they do you suppose??? You will have to come back on Friday, October 26th to find the answer to that question.  That is the day I will be participating in the Wicked Blog hop put on by Wendy.
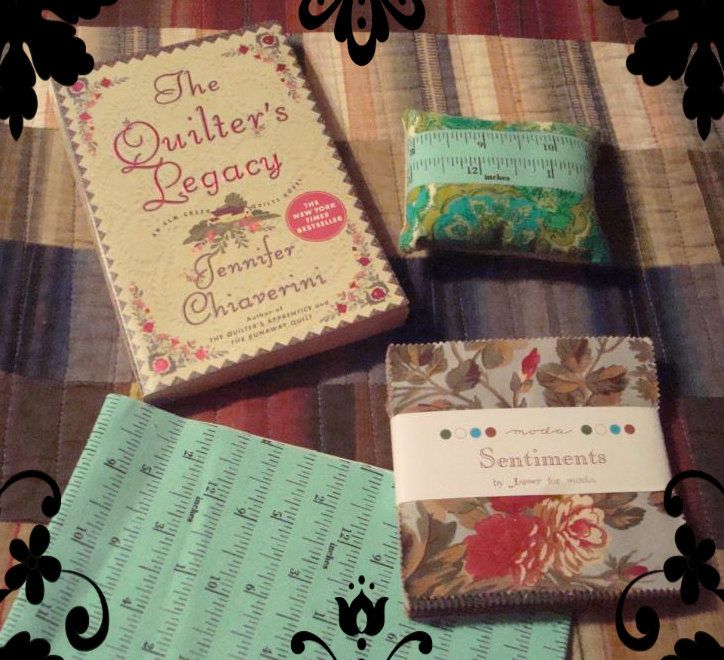
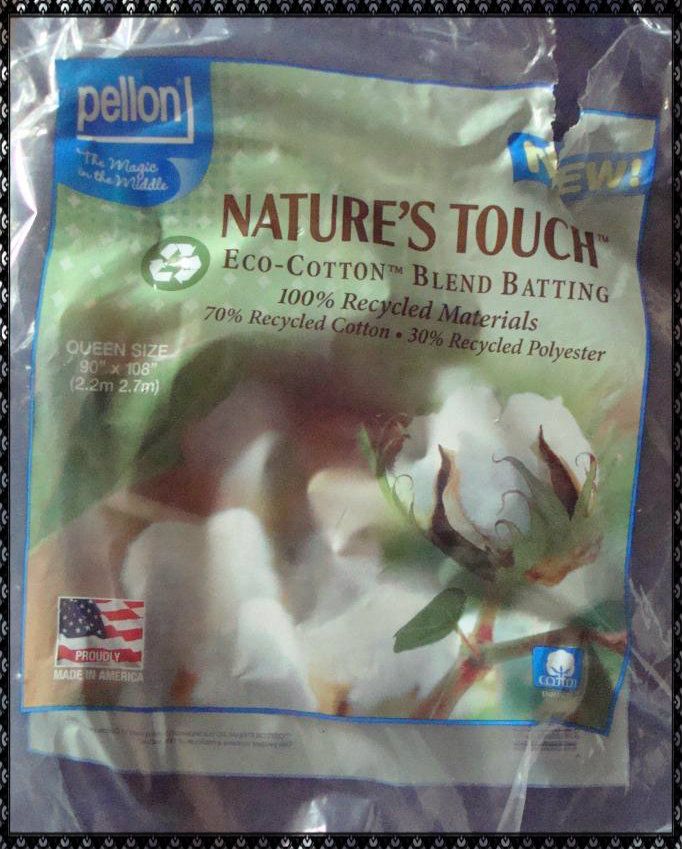
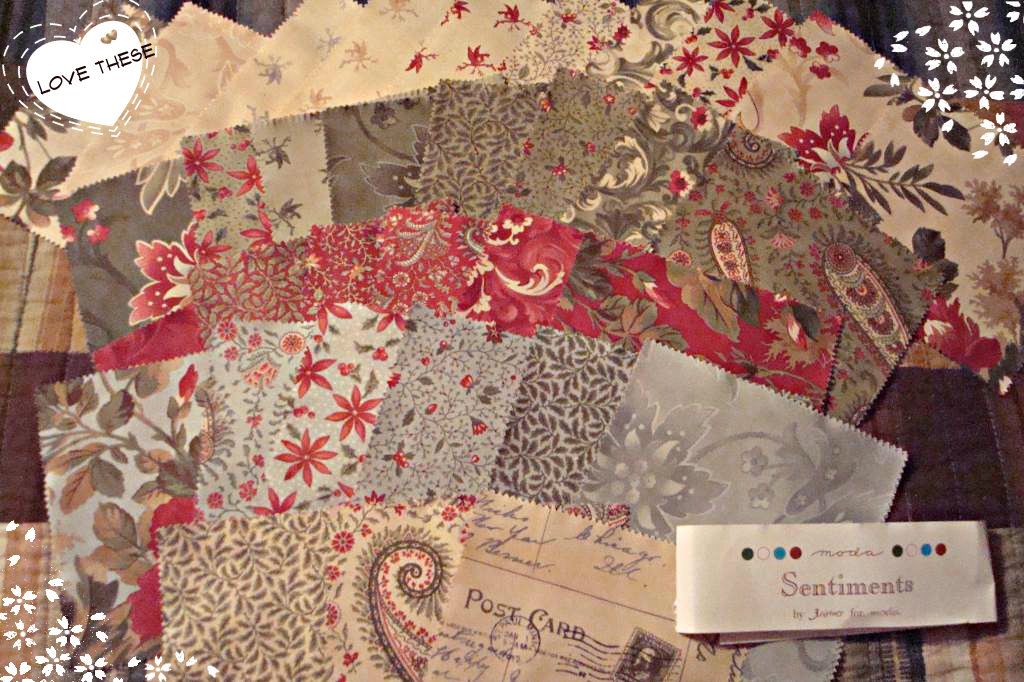
Next up was getting my raffle blanket machine quilted.  The due date is October 17th and since I want all my fellow employees to sign it, I need to have it done early.  I always dread the finishing process.  I hate layering the batting between the layers.  I can't stand that you can't see the bottom layer once you put the pieces together.  I certainly don't want wrinkles in the back.  Yesterday that process went very smoothly. No pun intended.  Maybe part of it was a new choice in batting. I'm not sure.  I used this new product and hope it continues to amaze me as it has so far.  It is the first time I have pre-washed a batting.  The bag says it could be quilted up to 8 inches apart which is a feature I like.  While many people quilt all over with inch by inch coverage, I think the quilt is so much softer and friendlier to use when quilting is farther apart.  I also am not the biggest fan of the wrinkles that happen when you wash the quilt so although this product reported a mere 2 to 3 percent shrinkage it also said it could be preshrunk.  I just had to soak the batting for 20 minutes in hot water and then wring dry and tumble dry in the dryer.  This is the part I find scary and have never attempted but it worked very well.  It came out of the dryer in one piece    ( which was a huge bonus!!!)  I had no problem with the layering of the project and it quilted very nicely with no bearding at all.   I did have a bobbin tension problem that took me a good hour to take care of.  Arrrrgh....I had to clean the dust bunnies out of there three times to get them all and after many attempts to change the bobbin tension with no luck finally just gave up and switched bobbins.  Should have started there because I think that was the winner, winner, chicken dinner. I got the project about 80 percent quilted not bad for the first day and will finish it today.  Speaking of winner, winner look what I won recently.  My grand daughter who is four was here this weekend when it arrived and she immediately thought the pincushion would make a great pillow for her bear who was also spending the night with us. I will have to make her one as this is definitely for my collection. I love it.  The charm pack is my first EVER.  It has a wonderful collection of fabrics in it and look forward to putting it to good use.
Don't you just love the fabrics that were in this charm pack???   I want to thank Elizabeth of pieceful life for the wonderful things she offered in her giveaway. The book was also a first for me and I have been wanting to read one of these quilting novels for a long time.  I started it last night with a glass of wine and a hot bath and it was the perfect way to end my  sweet day.
I can only hope day two of my my mini vacation 'ME' time goes as well.  Hope you are having a great day, too.  Hugs,

Saturday, September 8, 2012

Wicked Good Times Ahead

  
I am happy to have finally bit the bullet and joined my first blog hop!  I'm excited to be able to put my wicked thoughts to good use on this one.   Lions, tigers and bears, oh my...Witches, warlocks, what will I try???  Wendy from Why Knot Kwilt has invited us to share our dark or deliciously wicked sides Oct 22nd-31st.  It will also be a chance for me to find something wonderful to giveaway.  Now I will have to dare to be spooky. What wickedly, wacky, wonderful thing will I dare to do??? Stay tuned.....


Friday, September 7, 2012

See Saw Swap Block Progress this week

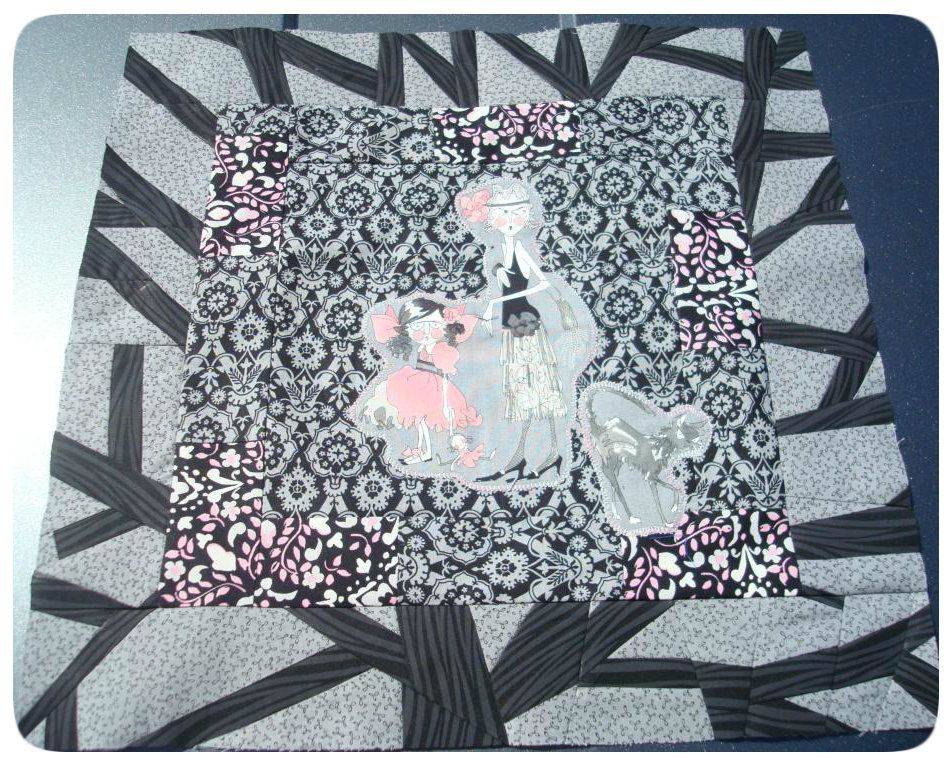
I thought I would share the method behind the madness with my partner's block this week.  I am putting the second round of the Ghastlie tree on her quilt and am sharing a little of how I am doing it.  This is my first tutorial and by no means the best teaching tool but here goes. This is how the block ended at round one.
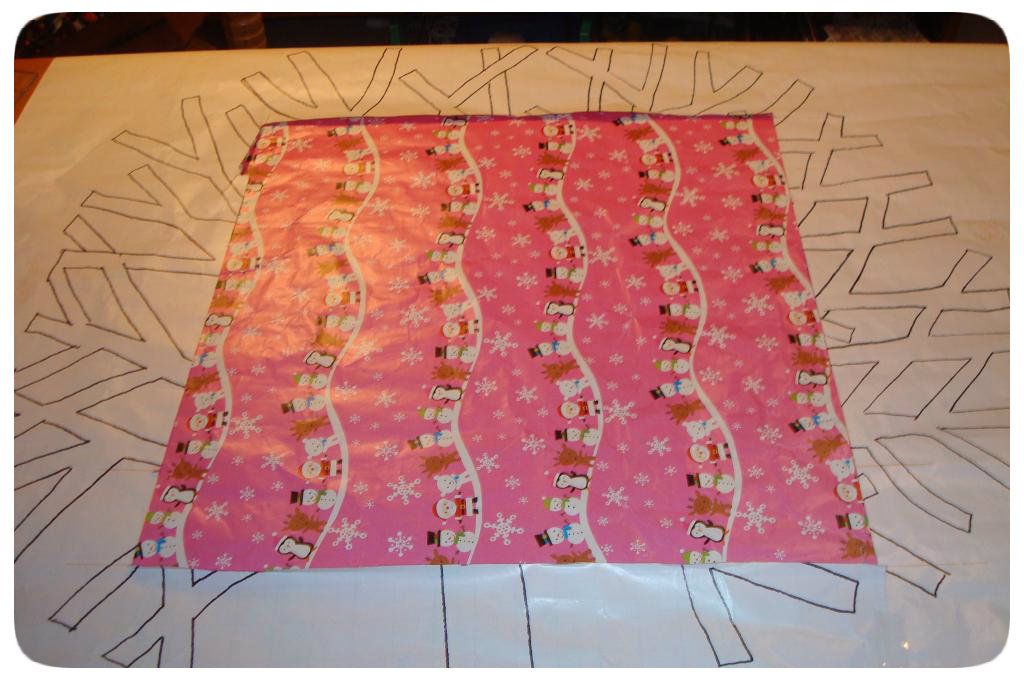
Sharon added a border and sent it back and I needed to add round two of my Ghastlie tree.  I had originally enlarged a ghastlie tree print from a picture of one and blew it up very large on a piece of Christmas wrapping paper.  Here is a picture of what was left of the pattern after round one.
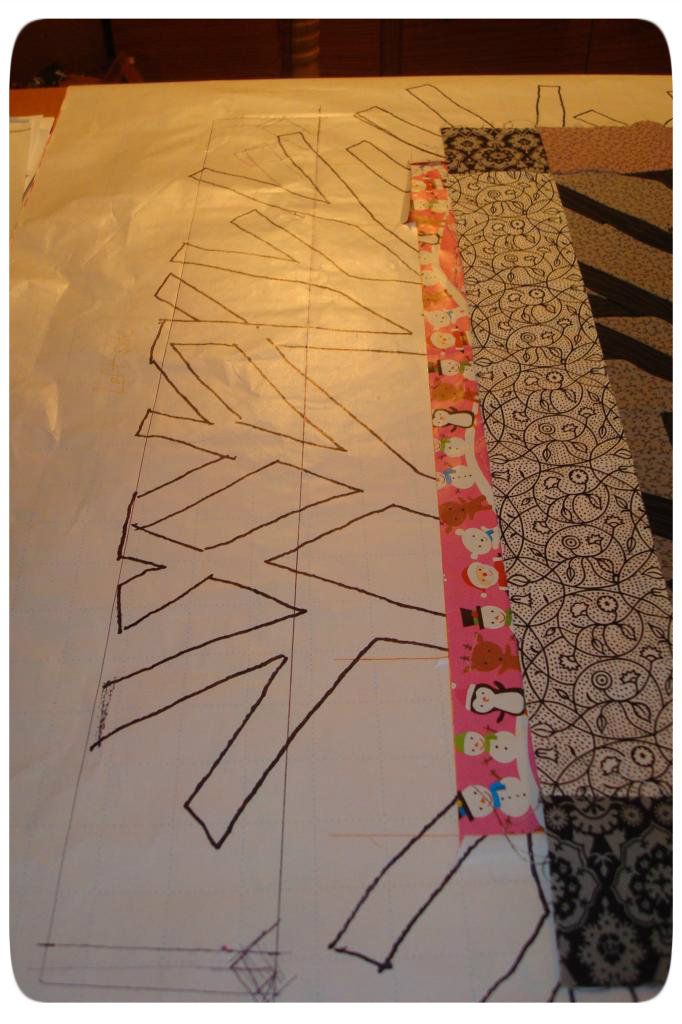
The center is the area where I cut out the size of Sharon's original block plus the area I used to make the first tree border.  Now I needed to cut out the size of Sharon's added border.  Which was 2 1/2", so I first drew a line at that width on the paper and then another at 3" out from there so my finished border will be another 2 1/2" when completed.
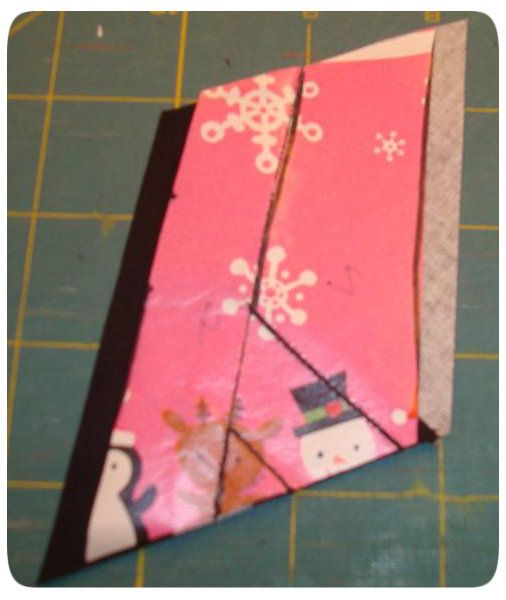
Then I cut that area out that I needed to be my border. Here is where the fun begins. I  need to look at it  and decide how I could paper piece each area and put it back together again.
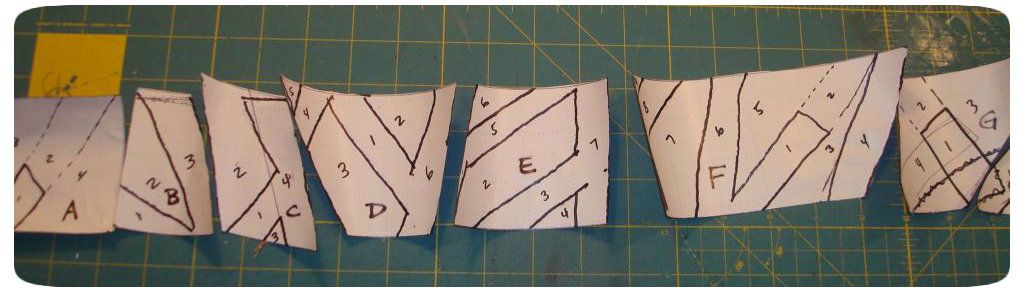
 Here is what I came up with. I know as I move them around I may get the order wrong so here is my solution.
I add the A - B- C - D- E- F -G -H labels to the patterns so I can have a reference how this goes back together.  After that I just paper piece each part, trim , and sew it all back together.
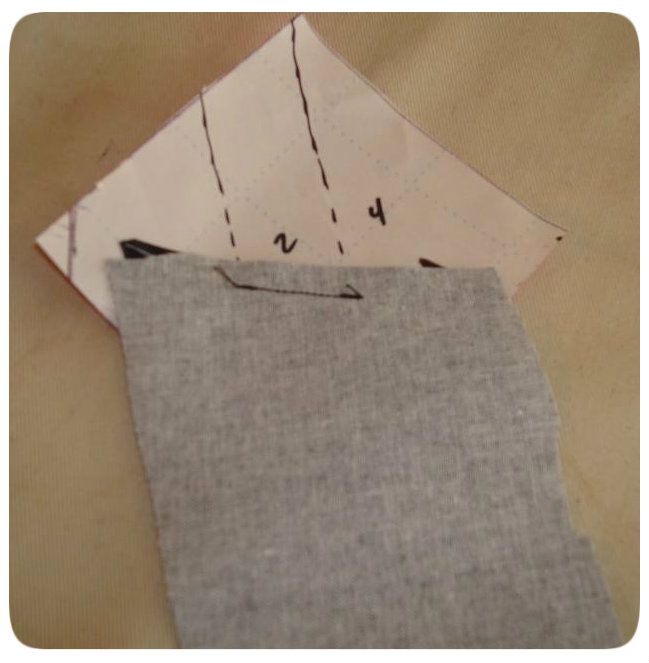
I like to start each piece by cutting the approximate size of fabric I need.  With paper piecing you want to make the pieces larger than the area you are covering.  It does waste a lot of fabric compared to conventional rotary cut pieces but I love what it allows me to create and for me it is worth the extra fabric it takes to create that look.  Because in paper piecing you will be creating a mirror image and I want the exact image I will need to be doing the sewing on the bottom side of the paper and putting the fabric on the top.  I just flipped the pieces over and drew my pattern on that side.  If it was difficult to see the pattern I could take it to a window and use the light to trace the pattern on the reverse side, but since I used a sharpie it was a pretty easy task.

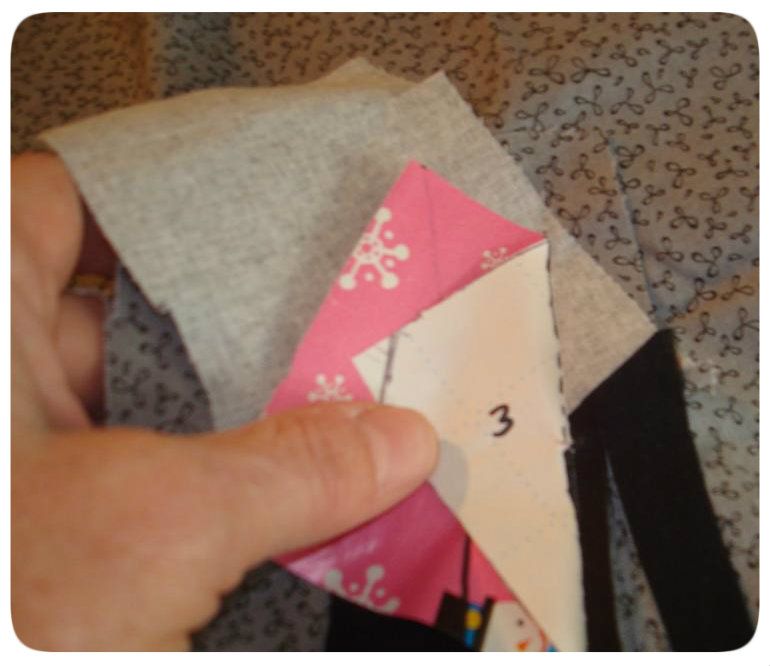
Next I just started building my pieces.  After each addition of fabric I just trimmed the fabric giving me my 1/4" seam allowance. I do this each time by just folding back the pattern and trimming the fabrics to a quarter inch by just estimating it like so.

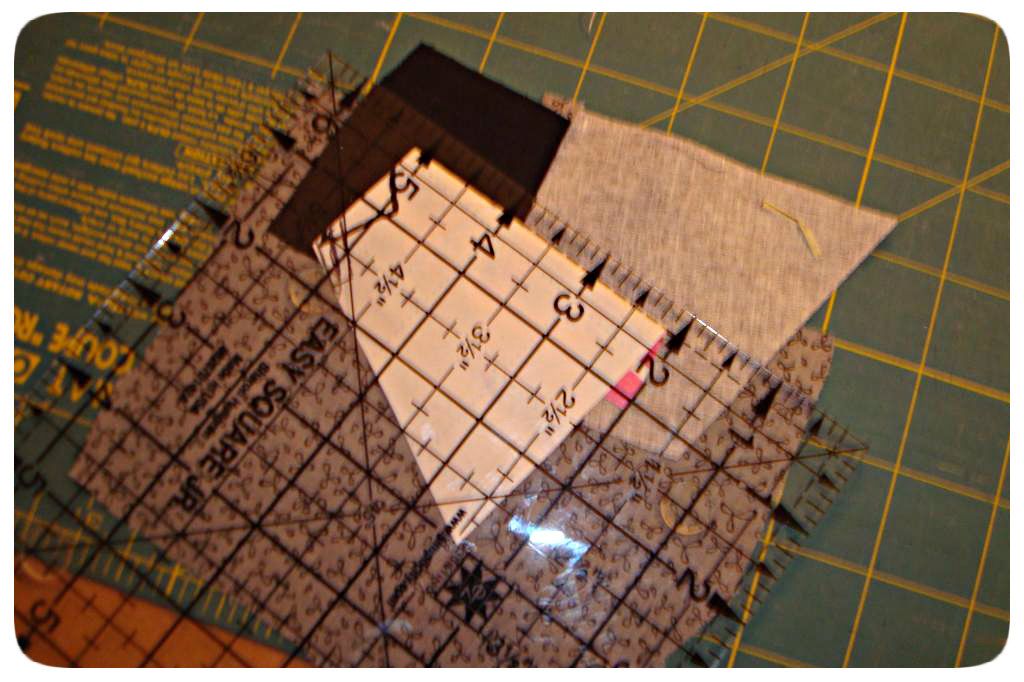
If you rather you can always use your rulers to trim fabrics back to the quarter inch but I like to speed the process up and just trim it to an approximate 1/4", if you prefer you can always use your ruler like so.
When I got each piece completed I just added a quarter inch to each of the sides I will be sewing back together to make my border strip.  Since I cut my pattern at 3" width I don't add the 1/4" inch to the top and bottom sides each time.
I must say this is the first time I have paper pieced using Christmas wrap. I did it out of necessity due to the size of the pattern when I enlarged it but I highly recommend it.  It tears off so easily when it comes to that step.  I have used tissue paper, cheap drawing pad paper, all kinds of quilt tear away papers and none remove as easy as this xmas wrapping paper.  I usually run my tissue paper through the copy machine but with this project I just drew it directly on the paper so the wrapping paper was a great choice.
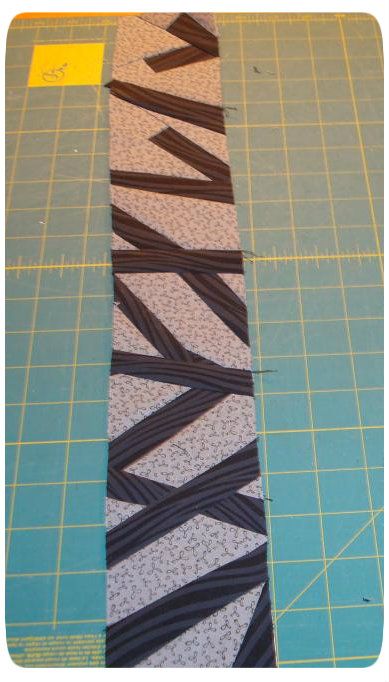
Once I had them all made and sewn together my border looked like this.  I put it and the other side on to get this far.
I've added the last two borders to the top and bottom and sent it out to my partner.  But she and you will have to wait to see the rest.  Just a peek for now, I hope she loves it as much as I do.  I can't wait to add my next go round onto the block, this has been one fun project to work on. See you soon Ghastlie block, I have a lot of work to do to get ready for my final turn at you :)  Looking forward to seeing you again.

Saturday, September 1, 2012

Wonderous Winnings
Here is some fabric I won a while back during one of the blog hops.  I won it from Sew Allegorical and thought it would come in very handy for my Halloween See Swap Block.  I have used the orange stars in it and the rest may have to wait for another project. I love the colors in this collection and am so thankful to Al for sharing it with me. She is fabric-oholic and I appreciate her sharing some of her Halloween stash with me.
This is the fab-tastic Pearadise FQ bundle I won when Sonja was born from her mom Bea and Connecting Threads.  I must say I was very impressed with Connecting threads service.  I had the fabric in just two days.  It helps that they are close to me and I fell in love with the fabric.  Funny how they always look so much better close up and personal.  It too had one fat quarter that was immediately put to use in my See Saw swap block.  I used the yellow cross hatched one in it.  I was pleasantly surprised with the quality of the fabric.  Connecting Threads has fabulous prices and I must say I think this line is a very good collection of fabric and look forward to finding where the rest of the fat quarters will end up being used.  Check them out:
Aren't the pears so cute?
Keep Stitchin'

Sunday, August 26, 2012

Falling in Love with Fall

The changing of the seasons has begun and I'm already lovin' it.  Been working hard on my Halloween See Saw Swap block and I am already getting in the mood to decorate for the season.  Did a little fall cleaning and got out all my candles---I love burning candles all Fall!!!  Not sure why I don't do it the rest of the year.
Our big reveal is in October but just have to share where it currently is in it's journey.   Sharon, my partner, added the candy corn border and I loved how it looked so I shifted the color theme in that direction and am so happy with the result. Woot woot!! 

Okay, for anyone keeping track, my border is going to finish at 3"---not the 2-1/2" it is suppose to be but the math was so much easier at the 1" block size...plus I'm pleased as punch with it.  I knew my eye was seeing yellow as the next border but I love the random mix of color that this brings and it doesn't pull my eye away from the happy fellows that are center stage.  In fact, I would swear the orange and yellow actually make me look at the orange and yellow the scarecrows are wearing. Now I swear I wish I could hide my picket fence.  Oh, well still lovin' it!!!

So today with my Feelin' Fall Ya'll mood,  I decided it was time for Ham and Scalloped potatoes.  Featuring potatoes and onions out of our garden.  So it was time time dig a few spuds up.  Before I could find some spuds, I found this instead.


At least three baby bunnies hiding in their burrow in the midst of all the weeds I never got around to pulling up this year.  Mommy bunny must have been in heaven with all the lettuce still in my garden.  One bunny took off and we couldn't find him and two remain although in this photo you can only see one.  We covered them back up and you guessed it no Scalloped Potatoes tonight.  I guess I'll have to buy some potatoes until these fellas move on in about a month.  They had their eyes open so we think they are about two weeks old right now.

Since I couldn't make Scalloped Potatoes and I have a craving for all things Fall right now, look what is now going to be my dinner tonight.
Don't you just love Fall???... Apple pie, candles, bunnies, scarecrows,  and where is that bottle of wine???
I know it is starting early but I feel the changing season is getting off to a good start. Enjoy the day your given you never know if you'll get another.  Hope that didn't come off sounding like Debbie Downer but I recently loss a close friend and co-worker --43 and Laura had a massive heart attack and she's gone in a blink of an eye-- shocks the system still.  So Carpe Deim friends and where did that bottle of wine get off to now...You know I'm going to find it.
Hugs and best wishes for a great week

Friday, August 24, 2012

Hexagon Hoot
Well here is the result of one of my outdoor cooking experiences last week.  Have you ever heard of pie irons?  We use them every time we go camping and every so often when we build a fire in the fire pit in the back yard.  They are great for making dessert after dinner.  In the past we have only made "pie" in them.  Here is our standard recipe:
  • Butter a piece of bread and sprinkle with cinnamon
  • Insert it into one side of the pie iron, butter side down
  • squish the bread down so you can make a hole for your fruit filling
  • spoon in the fruit filling of your choice -- we usually stick with can cherry or blueberry filling
  • butter another piece of bread and sprinkle with cinnamon
  • Insert it into the other side of the pie iron, butter side down
  • close the pie iron and lock down the clasp on the bar
  • cook for about 10 minutes, flipping sides every few minutes to toast bread evenly
  • Peek to see that it is done, if not close and cook longer
  • If golden brown,  pop it on a plate,  let it cool down and enjoy!
This trip we tried new recipes --- most with no trouble.  We made blackberry pies with fresh fruit and crescent dough for the crust.  Even though the ended up delicious---we were quite concerned when the dough started bubbly out the side of the pie irons.  What remained inside cooked up great.  What spilled out was fuel for the fire. We made cornbread--- it actually turned out awesome and never overfilled the iron. We could only fill one half of the iron and it raised great.  We also made grilled ham and swiss cheese sandwiches that were delicious.  With each of these recipes the KEY is to check and make sure you don't burn the what you are cooking.  Here is where I ran in to trouble on the trip.  I stopped to check that I wasn't burning what I was yearning to eat and here is what happened when I wasn't using my noggin'

I laid the pie iron on the empty chair next to me and the chair cushion instantly melted away.  Oops...My husband loves these chairs.  What to do???.... As it happens I had brought some extra fabric with me because I have always wanted to learn to make hexagons but had never taken the time to learn.  Since I thought it would be a great car ride or campfire filler I brought the instructions and some paper hexagon patterns with me.  I found this great free template download by Abi over at Snippets and Blabbery and I promptly cut out a few and was surprised how quickly I could put a whole flower together ---even though I was a complete newbie to this.  Must have been the added incentive of needing to fix my Hubby's beloved chair.


Yep that patch was going to be the perfect size to cover my
"Boo Boo"
So I just starting stitching that baby into place and 'Tada' all fixed and beautified!!!


Now I think I need to add a few more to really
max out the girl power on this chair.  You know this chair is permanently "mine".  Not sure if I want three or five of these on here to really cherry up this chair.


Here is a picture of the pie iron.  This is when we cooked cornbread to go with our Sausage and Bean Dutch Oven Stew. We thought we should go low heat and slow with these so we started out on top of the grate but ended up holding them below the grate to get enough heat to cook them.  They were delicious.


Keepin' it together --- do the same

Monday, August 20, 2012

Progress in Paradise
We spent the last week camping up on Mt Rainier at Cougar Campground and hiking up at Paradise Inn and at Sunrise on the Northeast side of the mountain.  The sub alpine meadows are in full bloom.  We saw deer but thankfully no bear or cougar.  Wouldn't you agree that these are pictures of Paradise for sure? It was great being unplugged for the week and relaxing. The sky is really that blue up there. I also got a lot of hand sewing done with two of my UFO's getting completed.  They now smell like a campfire but a good washing and they are going to look great on my tables.


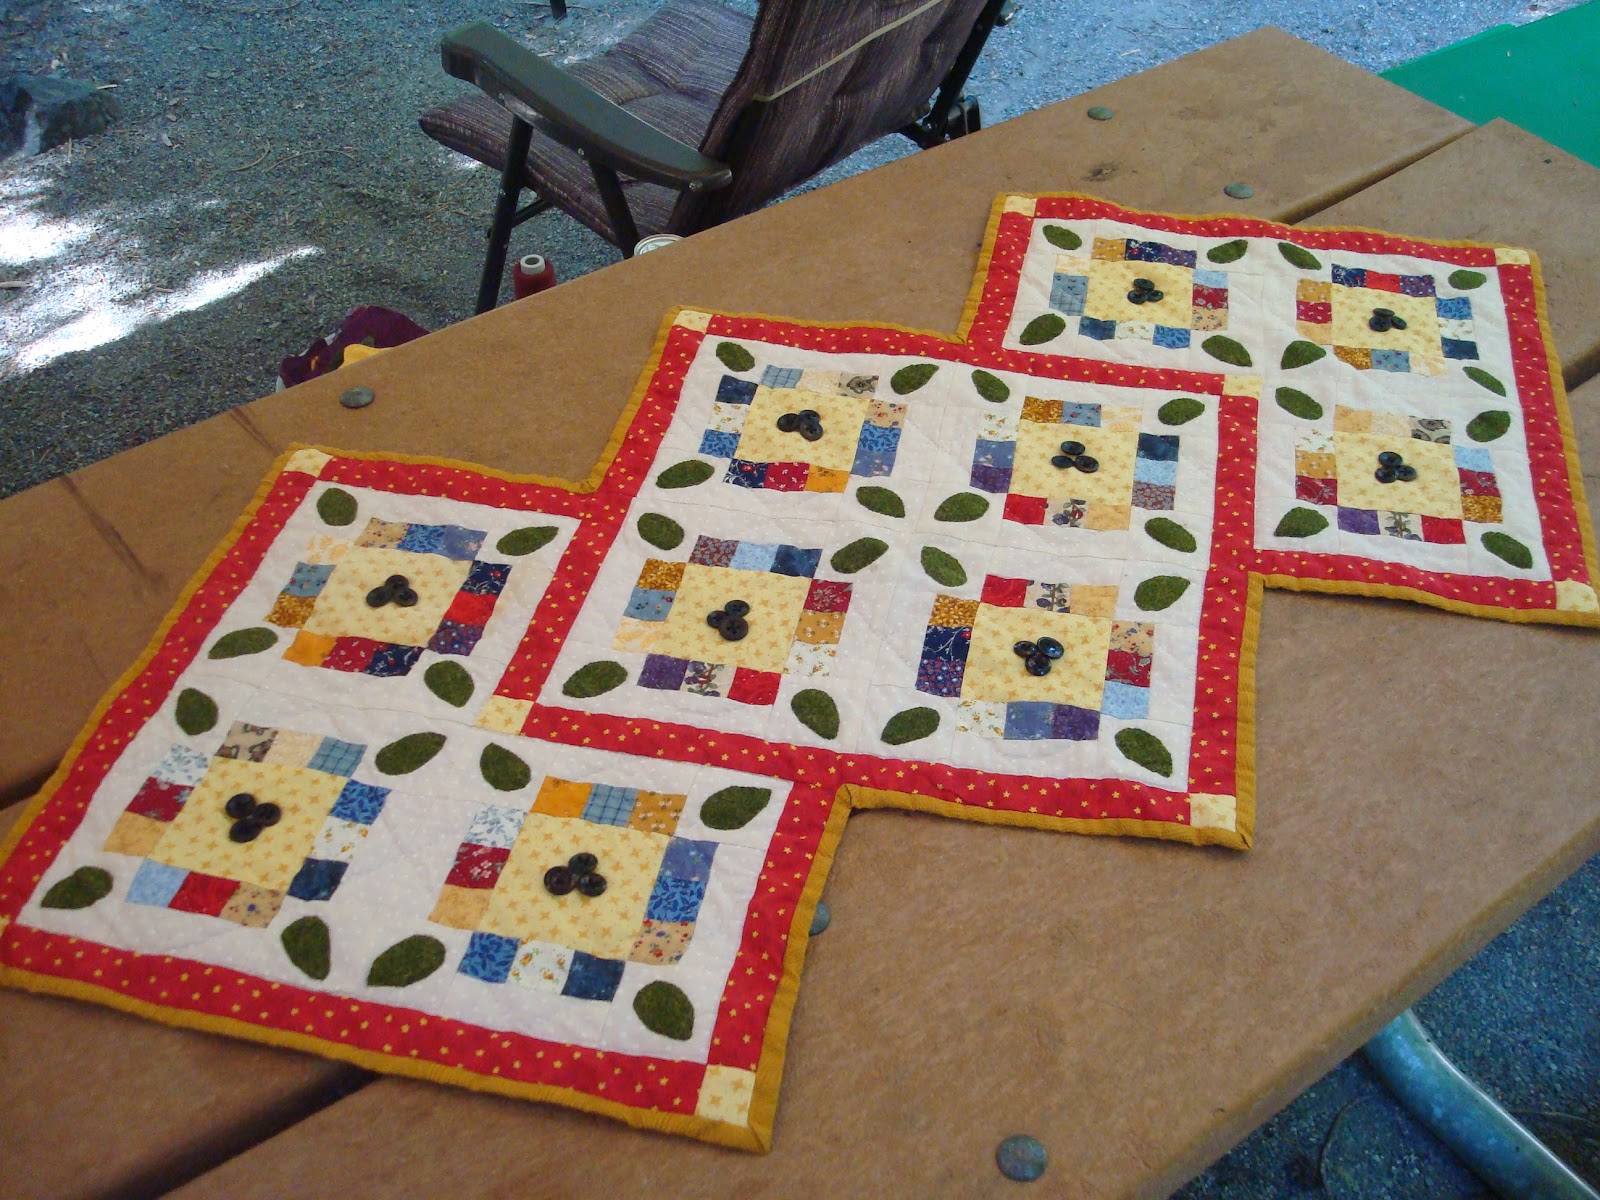
This is a table runner that I started over six years ago (when my kitchen was still red ---it no longer is).   I put off finishing it because it had inside corners to bind. I wasn't confident I could do that so I set it off to the side.  Come to find out inside corners are easier than outside corners and now I wish you could design a quilt with only inside corners. They are that easy. Here is a picture of the finished project.  I couldn't even find the pattern I used for this one but I think it had buttons in the center of the blocks for the flower centers so I put three in the middle of each flower.


I had another table runner that I had started about two years ago which at least matches my current decor.  It has lots of flowers sewn on it and each is hand quilted around the edges, as are each of the many leaves.
The flower centers are buttons covered with fabric and I LOVE how this turned out. I am doing a happy dance just looking at this makes my heart sing.  Check it out. Isn't it gorgeous?

I also had time to embroider one more garden step block on the drive up to Sunrise.  Which I am glad I had in the truck because the road is a series of switch backs climbing the mountain on cliffs with no shoulders on the road and I wasn't enjoying the view out the window like I should have.  It was almost too scary. I would love to do more hiking in that area but I don't really want to go up that road again any time soon.

I also took along some fabric to give making hexagons a try. I had the opportunity to give it a shot and will share that outcome later in the week. I got my see saw swap block back from my partner while I was gone for the Halloween See Saw Swap and will share it's progress soon, plus I won a fat quarter bundle from Bea
at beaquilter.  She just gave birth to a beautiful baby girl, Sonja, and I guessed her birth weight right on the nose and was closet to the right time of day she would make her arrival. Big thanks to Bea and all the Staff at Connecting Threads for Sponsoring this fun giveaway and the opportunity to put this fat quarter bundle of Pearadise to good use.  Hey maybe it was my being at Paradise that brought me the good fortune to win some Pearadise.  Just a thought...


Related Posts Plugin for WordPress, Blogger...