

This has been a lot of fun to put together this year. It contained a lot of firsts for me, also. It had the first tumbling block I've made and certainly the first Lemoyne Star. Best thing was I really love how the Lemoyne Star turned out! Not sure I had ever done partial seams before either. Applique is still not my favorite but I survived and grow more confident each time I do it :)
But one of the favorite things about this top is the HST border. I have always hated HST's. Yuck and worst is what I have to say to all those disgusting bias cuts. Never have found a great way to mass produce them...before now. Laura Nownes had a great little video each month but in her written instructions this last month said to use your favorite HST method. Great...I didn't have a favorite. Before this top, I would choose to use a Thangle paper and paper piece them just to try to avoid the bias problem but hated pulling all the paper off the triangles. I do it all the time for complicated paper piece patterns and think nothing of it. After all it is necessary to create the beautiful blocks that paper piecing can give you. But with triangles it just seemed such a waste of time. When I went into my file to find a Thangle the size I would need I found a piece of paper I had saved for years probably with never having tried it before.
Have you ever seen this method??? It is amazing???
You take the size you want your HST to be...in this case I needed it to be 3 1/2 inches
divide that number by 0.64
so my math problem would be 3.5/0.64 = 5.46875
so I rounded this up to 5 1/2 inches and added a 1/8" to be safe...better to round up and then you can trim your block down to the correct size if need be. You can always add a 1/8 to a 1/4 inch just to be safe like I did and then trim it down after the block is done.
Better safe then sorry :)
Better safe then sorry :)
You cut two squares of 5 1/2 inch blocks and put right sides together like so:
( In my example I am doing two pairs at once so 4 blocks):
 then
then
 placed right sides together like so
Then you sew a 1/4 inch seam around the entire perimeter
 I should have used a different thread color so it would be easier to see
then you are going to cut it on the two diagonals like so:
 and then the opposite direction

when you are done ... you will press open to get these units

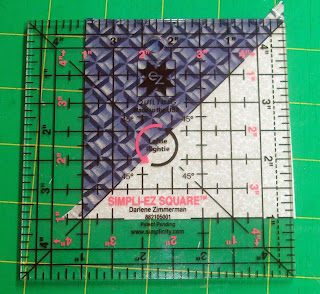
you will then trim them to the desired size
making sure to use the 45 degree line on your ruler and the dimensions you need
 and before you know it they are ready to use and perfect!!!
 Love when that happens!!!
After sewing for years on both sides of the diagonal and thus on the bias,
I don't know why this had never occurred to me, to sew around the perimeter and then still cut on the diagonal. Makes it easy peasy :)
Here is the math as I found it on the website I found this on. You can see the original post on Whipup
and a video from the Missouri Star Quilt Company
These are starting block sizes and the resulting HST size
12 1/2"------------> 8"
8 1/2"-------------> 5 1/2"
6 1/2" ------------> 4"
7" ---------------> 4 1/2"
7 1/2" ---------------> 5"
5 1/2" -------------> 3 1/4"
4 1/2"-------------> 2 3/4"
4 1/4" --------------> 2 1/2"
4" --------------> 2 1/4"
If you try this method I think you will agree it is brilliant!!!
Keep Stitchin'
( In my example I am doing two pairs at once so 4 blocks):


Then you sew a 1/4 inch seam around the entire perimeter

then you are going to cut it on the two diagonals like so:


when you are done ... you will press open to get these units

you will then trim them to the desired size
making sure to use the 45 degree line on your ruler and the dimensions you need


After sewing for years on both sides of the diagonal and thus on the bias,
I don't know why this had never occurred to me, to sew around the perimeter and then still cut on the diagonal. Makes it easy peasy :)
Here is the math as I found it on the website I found this on. You can see the original post on Whipup
and a video from the Missouri Star Quilt Company
These are starting block sizes and the resulting HST size
12 1/2"------------> 8"
8 1/2"-------------> 5 1/2"
6 1/2" ------------> 4"
7" ---------------> 4 1/2"
7 1/2" ---------------> 5"
5 1/2" -------------> 3 1/4"
4 1/2"-------------> 2 3/4"
4 1/4" --------------> 2 1/2"
4" --------------> 2 1/4"
If you try this method I think you will agree it is brilliant!!!
Keep Stitchin'
your top looks great .. well done x I LOVE this way of making half suare triangles .. and because you get 4 in one go it is so quick xx glad you found .. and used it x
ReplyDeleteYour quilt top is just lovely.
ReplyDelete